


NFT stands for Non-Fungible Token. Don’t worry, if this full form does not make any sense, right now. You will have a clear understanding of NFTs once you are done reading this post. Before, we start talking about Non-Fungible let’s understand what is Fungible?
Fungible means anything that does not have any unique characteristics. For e.g., If I have borrowed a 100 dollar bill from you which has serial number US08765. The next day, I have returned you a 100 dollar bill let’s say with a serial Number of US0976178. Serial Number does not make any difference because you just care about the value. Fiat currency USD, Bitcoin, Ethereum are a few examples of Fungible because there is nothing unique about them except their value.
What is Non-Fungible (NFT)? Anything which has unique characteristics and is irreplaceable falls under the NFT category. For example, Mona Lisa art cannot be replaced with anything else because it is unique. I hope now you know the difference b/w fungible and Non Fungible.
NFTs can be anything digital such as digital art, a gaming character, your weapons in games, etc.
How to Create an NFT?
I am going to explain how to mint(create) and deploy your first NFT programmatically but if you are someone who just wants to know how to create NFT without programming then check out this video.
Install Node Js by clicking on this link if you don’t already have it. Install the below dependencies to create an NFT. We need a hardhat framework to deploy and interact with our smart contracts.
Disclaimer: This code is not audited and should not be used in Production. This is just for education and learning purposes.
					npm init -y
npm install --save-dev hardhat
npm install nft.storage
npm install mime
Only Windows users – Run one additional command
npm install --save-dev hardhat@^2.9.1 @nomiclabs/hardhat-waffle@^2.0.0 ethereum-waffle@^3.0.0 chai@^4.2.0 @nomiclabs/hardhat-ethers@^2.0.0 ethers@^5.0.0
nft.storage and mime libraries are required to publish your NFT image and metadata on IPFS. Don’t worry, if the metadata part does not make any sense. You will have a clear understanding as we progress.
Run the below command to create a sample hardhat project and choose Create a basic sample project option from the CLI. Hit enter twice and it will create the sample project.
npx hardhat

Now you should see new folders and files are added in the left panel.

Click on the contracts folders and create a new contract file NFT.sol and add the below code in it.
					// SPDX-License-Identifier: MIT
pragma solidity ^0.8.0;
import "@openzeppelin/contracts/token/ERC721/ERC721.sol";
import "@openzeppelin/contracts/token/ERC721/extensions/ERC721URIStorage.sol";

contract NFT is ERC721URIStorage {
    uint private tokenId;
    constructor() ERC721("Anni Maan", "AM") {}

    function mintNFT(string memory tokenURI) public returns(uint){
        tokenId += 1;
        _safeMint(msg.sender, tokenId);
        _setTokenURI(tokenId, tokenURI);
        return tokenId;
    }
}
constructor() ERC721(“Anni Maan“, “AM“) {}
Our NFT Name is Anni Maan and the symbol is AM(Anni Maan). mintNFT is the main function that will create our NFT. Run the below command to compile the contract. Open your integrated terminal in VS Code and it will compile the Smart contract to deploy our NFT.
npx hardhat compile
We need an Image to create the NFT and some information about our NFT like a description, background color, clothes, etc.
There are 2 options to store all this information.
- The first option is, to store everything on Blockchain which will be very costly.
- The second option is, to store images and all the related information off-chain but we cannot store all this information on a centralized server like AWS because if that server goes down you won’t be able to access your NFT and plus there is a risk that centralized authority can easily change the information that you have stored.
How to resolve this problem?
The answer is IPFS. IPFS is a decentralized storage solution that guarantees that your data will be always available and no one will be able to change anything. Just like blockchain once data is stored and cannot be changed even on IPFS, data will live forever and no one can change anything.
Storing data on IPFS is a two-step procedure
- Upload your image that you want to use as NFT
- Add all the information related to that image such as description, background color, clothes, etc, and the image URL in a JSON file.
Now JSON file’s URL will be passed as a second argument(tokenURI) to mintNFT function in our smart contract to create the NFT.
Below is the Sample metadata.json file
{"name":"Anni Maan's NFT","description":" Creating NFT for Anni Maan","image":"ipfs://bafybeihtxsedju6ddhtkf32zpz64ggf34wxnicyot7p4cdbkatcd6ajhyy/Anni_Maan_NFT.jpg"}
Now, we need a way to publish our NFT image and metadata information on IPFS. We will use the below image as our NFT.

The first approach is, to create an account on pinata and upload your NFT image and metadata.json file manually and then get the link of your metadata.json file and use it as tokenURI.
The second approach is to do it programmatically. Since we are developers so I would like to do it programmatically. To do this programmatically, I need to create an account with nft.storage to get our API keys. Click on API keys to create your API keys.
Create a new file upload.js inside the scripts folder and copy-paste the below code. Make sure you update the NFT Storage API key that you have created in the previous step. Also, copy Anni_Maan_NFT.jpg image file in Hardhat folder. You can choose any image extension like JPG, PNG, JPEG, etc., and then update the name of the image accordingly in the scripts.
					const { NFTStorage, File } = require("nft.storage");
const mime = require("mime");
const fs = require("fs");
const path = require("path");

const NFT_STORAGE_KEY =
  "YOUR-NFT-STORAGE-API-KEY";

async function fileFromPath(filePath) {
  const content = await fs.promises.readFile(filePath);
  const type = mime.getType(filePath);
  return new File([content], path.basename(filePath), { type });
}

async function storeNFT(imagePath, name, description) {
  const image = await fileFromPath(imagePath);
  const nftStorage = new NFTStorage({ token: NFT_STORAGE_KEY });

  return nftStorage.store({ image, name, description });
}

async function main(imagePath, name, description) {
  return await storeNFT(imagePath, name, description);
}

if (require.main === module) {
  try {
    main("Anni_Maan_NFT.jpg", "Anni Maan NFT", "This is Anni Maan's First NFT");
  } catch (err) {
    console.log("Error while Creating the NFT", err);
  }
}

module.exports = main;
Let’s create our deploy.js file to deploy our NFT. Create deploy.js file inside the scripts folder and copy-paste the below code. Make sure you update your public address in line number 29 to mint your NFT.
					// We require the Hardhat Runtime Environment explicitly here. This is optional
// but useful for running the script in a standalone fashion through `node <script>`.
//
// When running the script with `npx hardhat run <script>` you'll find the Hardhat
// Runtime Environment's members available in the global scope.
const hre = require("hardhat");
const upload = require("./upload");

async function main() {
  // Hardhat always runs the compile task when running scripts with its command
  // line interface.
  //
  // If this script is run directly using `node` you may want to call compile
  // manually to make sure everything is compiled
  // await hre.run('compile');

  // We get the contract to deploy
  const NFT = await hre.ethers.getContractFactory("NFT");
  const nft = await NFT.deploy();

  await nft.deployed();

  console.log("NFT Contract deployed to:", nft.address);

  // Create NFT
  const result = await upload(
    "Anni_Maan_NFT.jpg",
    "Anni Maan's NFT",
    " Creating NFT for Anni Maan"
  );

  console.log("NFT META File URL", result.url);
  await nft.mintNFT(result.url);
}

// We recommend this pattern to be able to use async/await everywhere
// and properly handle errors.
main()
  .then(() => process.exit(0))
  .catch((error) => {
    console.error(error);
    process.exit(1);
  });
One last step, Update your private key and the rinkeby network endpoint in hardhat.config.js file. You have to create an account with Infura to get your endpoint. Watch this video to create your Infura account and select rinkeby from the dropdown to get your endpoint and update it in the below file.
					require("@nomiclabs/hardhat-waffle");

// This is a sample Hardhat task. To learn how to create your own go to
// https://hardhat.org/guides/create-task.html
task("accounts", "Prints the list of accounts", async (taskArgs, hre) => {
  const accounts = await hre.ethers.getSigners();

  for (const account of accounts) {
    console.log(account.address);
  }
});

// You need to export an object to set up your config
// Go to https://hardhat.org/config/ to learn more

/**
 * @type import('hardhat/config').HardhatUserConfig
 */
module.exports = {
  solidity: "0.8.4",
  networks: {
    rinkeby: {
      url: "YOUR-INFURA-END-POINT",
      accounts: [
        YOUR-PRIVATE-KEY",
      ],
    },
  },
};
Deploy NFT Smart Contract
npx hardhat run scripts/deploy.js --network rinkeby
Now, our NFT is available on opensea. Connect your metamask wallet and make sure you are connected to the RinkeBy network.
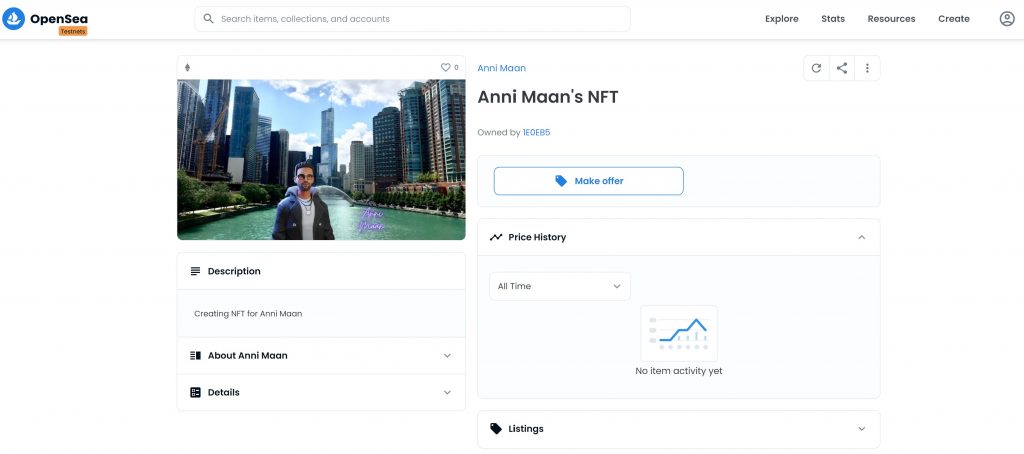
If you are wondering, how our NFT is available on Opensea because we did not do anything to make our NFT available on Opensea’s website. Opensea listens for all the newly launched NFTs and makes them available on their website. How opensea listens and makes these NFTs available on their website is the topic for another blog.
For more FREE courses and blogs, you can connect with me on Twitter where I share daily tips and tricks regarding Blockchain and WEB3.
Follow @Anni_Maan
How to update our private key in last step…kindly reply me plz
You can just paste your Private Key in place of “YOUR-PRIVATE-KEY”. You can get your private key from metamask export option. I hope this helps.